The Folders page is used for managing your folders and subfolders. You can create, rename, and delete folders and set sharing rights to give other users permission to view or edit a folder's content. There are also options on this page to designate certain special folders, the folders that you wish to use for message drafts, sent messages, and trash. And you can designate your default calendar, contacts, tasks, and notes folders. Further, you can import and export appointments and contacts to your calendar and contacts folders.
The Inbox is your main mail folder and the default folder in which your messages will be stored. It appears at the top of your Folder List along with your default and special folders. Any other folders you create will appear below them. Select any folders you wish to subscribe to by clicking the checkbox next to the folder name (in the Pro theme, click the folder name first, then click Subscribe), and messages can be automatically routed to specific mail folders by using Filters.
Show Folders By Type
Check this box if you want the Folder List to display only folders that match the type of folder being viewed. For example, when viewing the Message List only email folders will be listed, and when viewing Contacts only contacts folders will be listed. This option is only available in the WorldClient theme, and it is enabled by default.
Show Favorites
Check this box if you wish to display the Favorites list in the Pro, LookOut and WorldClient theme's Folder List.
Show Saved Search Folders
Check this box to have your Saved Searches appear in the Folder List in the WorldClient and Lookout themes.
Auto-Cancel Saved Search
Check this box if you want an email search to be canceled automatically whenever you click on another folder in the Folder List. Ordinarily, when this option is disabled, switching to another folder will not cancel the search. Instead, messages in that folder that match the search criteria will be displayed. To cancel a search you must click the "X" button in the search bar.
Create [All Unread | All Flagged] Saved Search
When the Show Saved Search Folders option above is on, the first time you sign in to Webmail a pop-up message will appear, asking you if you "Would you like to create an 'All Unread' saved search?" Then it will ask, "How about an 'All Flagged' saved search?" If you choose "Yes" to either of those questions then Webmail will automatically create the corresponding Saved Search for you. If you choose "No" then a button will appear here so that you can easily create the saved search yourself in the future. Once you have created one of those searches, its corresponding button will disappear.
Hide Unsubscribed Folders
If you wish to hide all folders that you are not subscribed to, enable this option. Hidden folders will not appear in the Folder List.
Enable Drag and Drop to move folders
This option allows you to move folders into other folders in your main Folder List, by dragging and dropping them. If you find that you occasionally move your folders by accident, turning off this option will prevent that.
Default User Folders
Use the options in this section to designate your default Calendar, Contacts, Tasks, Notes, and Documents folders. The default folders are opened when you click the corresponding links in the navigation pane or on the toolbar.
Use the options in this section to designate which of your folders will be used as these special purpose folders:
•Drafts - This folder is used for storing messages that you haven't yet finished composing or you wish to send later. Messages will be moved to the Drafts folder when you click Send Later on the Compose or Spell Check page.
•Sent - When you send an email message, a copy of it will be stored in this folder.
•Trash - This folder is used to protect you from accidentally deleting messages. When you delete a message from the Message Listing it will be moved to the Trash folder rather than immediately deleted. Depending on your account settings, messages contained in the Trash folder may be permanently deleted when you sign out or a specific limit is reached. Contact your mail administrator to determine what size or number limitations (if any) may be applied to your account. This option is not used if you have selected Flag as Deleted as your Message Deletion option on the Personalize page.
Creating a Folder
To create a new folder in the WorldClient or Lookout theme:
1.Click Options and then Folders to go to the Folders page.
2.Click New Folder.
3.Type a Folder Name.
4.Choose a folder from the drop-down Nest under list if you want this to be a subfolder of an existing folder. Leave this blank if you want it to be a new top-level folder.
5.Select the type of folder you'd like to create: Email, Calendar, Contacts, Tasks, Notes, or Documents. Some users may not be allowed to choose some folder types.
6.Click Save.
To create a new folder in other themes:
1.Click Options and then Folders to go to the Folders page.
2.Type a name for your folder into the New Folder box at the top of the page.
3.Choose aNest Under folder from the drop-down list if you want this to be a subfolder of an existing folder. Leave this set to <ROOT> if you want it to be a new top-level folder.
4.Select the type of folder you'd like to create: Email, Calendar, Contacts, Tasks, Notes, or Documents. Some users may not be allowed to choose some folder types.
5.Click Save (in the Lite theme, click Create then Save).
Renaming a Folder
To rename one of your folders:
1.Click Options and then Folders to go to the Folders page.
2.Click a folder and click Rename, or click the icon in the Rename column next to the folder that you wish to rename.
3.Type the new name for the folder.
4.Click Save Changes.
Deleting a Folder
When you delete a folder, all messages that are contained in that folder will be deleted as well. Beside each folder listed on the Folders page is the count of messages currently contained in the folder. To delete a folder:
1.Click Options and then Folders to go to the Folders page.
2.Click a folder and click Delete, or click the icon in the Delete column next to the folder that you wish to delete.
3.Click OK.
Sharing Folders
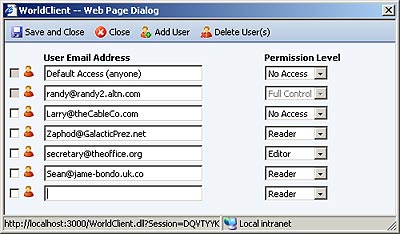
If you wish to give another Webmail user (or an MDaemon Connector user) permission to access one of your folders, you can set the folder's access settings by clicking the Share Folder link next to the folder you wish to share (in Pro, click a folder then click Share). This will open a page for specifying the user's email address and level of permission that you wish to grant. You can set the permission level to: Full Control, Editor, Reader, or No Access.
•Full control will grant a user complete control over the messages, contacts, tasks, notes, documents, or appointments in a folder.
•Editors can read, insert, and delete a folder's contents. They can also toggle the read and unread state of a message.
•Readers can read the contents of the folder but will not be able to modify it in any way. They cannot mark an email folder's messages as read.
•No Access prevents the user from seeing the folder or its contents.
Creating Public Calendars
You can publish a calendar to a publicly accessible link, and in most cases password protect the calendar if you choose. To publish a calendar, in the LookOut or WorldClient theme, go to Options » Folders and click the link in the "Share Folder" column of the calendar you wish to publish (alternatively, on the Calendars page, right-click the calendar's name under My Calendars, and click Share Folder. In the dialog, open the Public Access tab and, if desired, fill in the display name or require a password, then click the "Publish Calendar" button. A dialog will then open to confirm that you wish to create a public URL to the calendar. After clicking OK, an alert will display the new URL where the calendar is available. There will also be a link displayed on the page once the calendar has been published. To unpublish the calendar, click the "Unpublish Calendar" button. To change the password or the display name, click the "Update" button. There are also options on this page for setting the published calendar's default view (e.g. Month/Week/Day) and also providing a Free/Busy link. In the Pro theme, to reach these features, go the the Calendar, tap the menu button in the top-right corner, and tab Publish Calendar.
Importing/Exporting Contacts or Calendar Data
Importing Contacts or Appointments
To import contacts or appointments into a contacts or calendar folder in Webmail:
1.From within Microsoft Outlook, use its export tools to create a "Comma Separated Values (Windows)" export file containing the data you wish to import into Webmail.
2.In Webmail, click Options and then Folders.
3.Click Import next to the desired calendar or contacts folder.
4.Browse to the comma separated values file that you created in step 1.
5.Click Import.
Exporting Contacts
To export the contacts from one of your contacts folders into a "Comma Separated Values (Windows)" file, which you can use to import them into Microsoft Outlook:
1.In Webmail, click Options and then Folders.
2.Click Export next to the desired contacts folder.
3.Click Export.
4.Click Save and choose a location for your file.
5.Click Save.
Exporting Appointments
To export a calendar's appointments into a "Comma Separated Values (Windows)" file, which you can use to import them into Microsoft Outlook:
1.In Webmail, click Options and then Folders.
2.Click Export next to the desired calendar folder.
3.Use the drop-down list boxes to select the date range you wish to export.
4.Click Export.
5.Click Save and choose a location for your file.
6.Click Save.
See Also